This documentation should work for most newer releases of Fedora, Ubuntu, Debian, Trisquel, Linux Mint, and most modern distributions.
## list wifi devices available
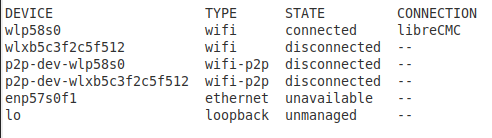
nmcli dev status
# Example of output:
## scan for wifi access points utilizing a specific wifi card or device
## note in the example prior it shows two type wifi devices, one is an internal card on a
## laptop, wlp58s0, and the other is a ThinkPenguin, Inc USB wifi adapter wlxb5c3f2c5f512
# first lets utilize our internal wifi card
nmcli dev wifi list ifname wlp58s0
# Example of output:

# now let us try the other USB wifi adapter
nmcli dev wifi list ifname wlxb5c3f2c5f512

## lets now try and connect to the libreCMC SSID (access point/wireless router) utilizing the
## ThinkPenguin USB wifi adapter (which was device wlxb5c3f2c5f512)
sudo nmcli dev wifi connect libreCMC password 'mypassword' ifname wlxb5c3f2c5f512
# Example of output:
Device 'wlxb5c3f2c5f512' successfully activated with 'a1900bed-baa9-47a3-affb-b640d0effe5d'.
A bit dated documentation for older distributions
The below documentation is applicable on distributions such as Ubuntu, Debian, Trisquel, Linux Mint, Devuan, and other similar distributions (anything derived from these in other words). The below works with at least versions of Ubuntu from 14.10-18.04, Debian 8-10, and Trisquel 7-9. Most likely it'll work with future versions of these distributions as well. However if you believe the directions need updating please contact support.
Step 1: Give yourself administrative access:
sudo su
Step 2: Install wpasupplicant and wireless-tools:
Note: You will need a wired connection temporarily, or will need to copy the appropriate packages over from another computer. These packages may also already be installed. If they are then you can skip this step. If you have a ThinkPenguin USB Wireless N adapter you may also need to download firmware if on Debian, and place it in the /lib/firmware folder (htc_9271.fw firmware is for TPE-N150USB & TPE-N150USBL and htc_7010.fw firmware is for TPE-NUSBDB).
apt-get install wpasupplicant wireless-tools
Step 3: Identify your network adapter from a terminal by running the command below:
ls /sys/class/ieee80211/*/device/net/
Step 4: Stop Network Manager if it is running (this is only if you have a graphical desktop environment installed):
service network-manager stop
or on newer distributions like Debian 10:
systemctl stop network-manager
Step 5: Create a wpa_supplicant.conf file by replacing access_point_name with your SSID:
wpa_passphrase "access_point_name" > /etc/wpa_supplicant.conf
wpa_passphrase "access_point_name" passphrase > /etc/wpa_supplicant.conf
Note: You'll probably get a prompt to enter your access point password when you run the above command (first line), enter it. If you do not then try the 2nd line and replace passphrase with the password for your SSID. Some distributions like Devuan may require it.
Step 6: Add the following at the end of your /etc/network/interfaces file and save (CTRL+X and hit Y):
nano /etc/network/interfaces
Add the follow to the bottom of the file (if your wireless adapter does not show up as wlan0 replace it with what did show up when running ls /sys/class/ieee80211/*/device/net/) to get an IP address automatically via your DHCP/router/access point:
In older releases you can do:
auto wlan0
iface wlan0 inet dhcp
wpa-driver nl80211
wpa-conf /etc/wpa_supplicant.conf
In newer distributions like Debian 10 put in:
allow-hotplug wlan0
iface wlan0 inet dhcp
wpa-driver nl80211
wpa-conf /etc/wpa_supplicant.conf
In older releases if you prefer to set a static address:
auto wlan0
iface wlan0 inet static
address 192.168.1.111
netmask 255.255.255.0
gateway 192.168.1.1
wpa-driver nl80211
wpa-conf /etc/wpa_supplicant.conf
You will also need to add a nameserver to the /etc/resolv.conf file:
nano /etc/resolv.conf
nameserver 8.8.8.8 (you can also replace this with your preferred nameserver; the one here is that of Google)
Notes for setting a static IP address: You'll need to determine the routers IP address in order to fill in the gateway address above. Most home routers have a default IP address of: 192.168.1.1, 192.168.0.1, 192.168.2.1, 192.168.1.100, 192.168.0.100, or 192.168.2.100
255.255.255.0 is almost always the netmask. You probably won't need to change this.
The "address" line under iface is the address of the computer. Notice that you'll need to pick an IP address that is not in use by another computer on the network. The static address you pick also needs to be in the same address range as the router's IP address. If the router's address is 192.168.0.1 then you would set a static IP like 192.168.0.240.
Step 7: Activate the wireless connection:
ifup wlan0
In newer releases you may need run this instead (Debian 10+):
systemctl restart wpa_supplicant
If that doesn't work just reboot.
Step 8: Test the connection
ping -c 5 thinkpenguin.com
After a few seconds you should see:
5 packets transmitted, 5 received, 0% packet loss, time 4005ms
If it says 0% packet loss then you're successfully connected to the network (and internet).